It decides when the buzzer should beep.
Arduino
The brain
Loading part…
if statement branches output
Play a buzzer tone when the button is pressed using an if statement.
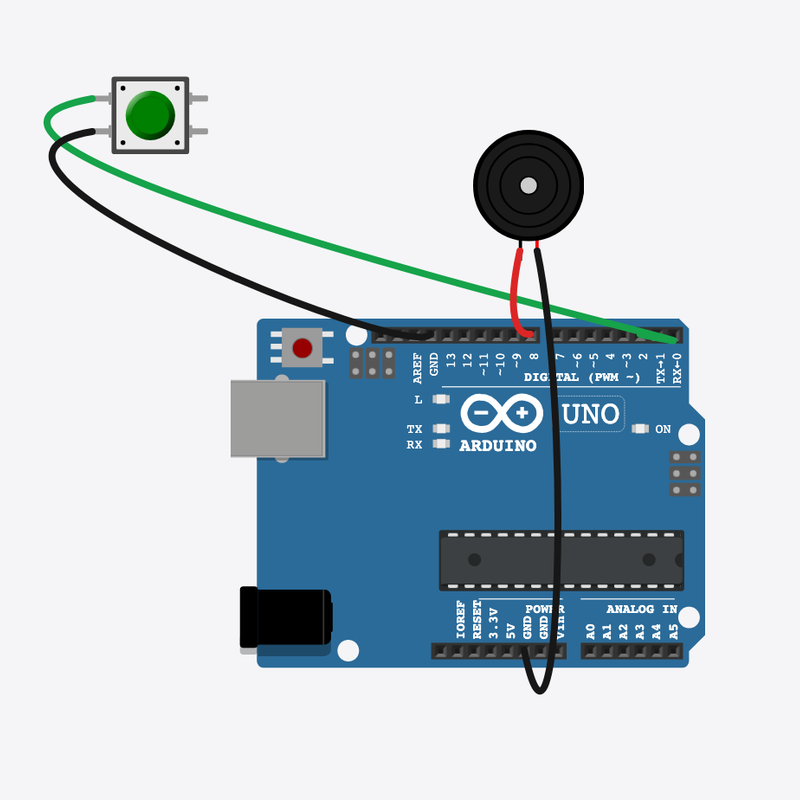
Pin connections
| Part 1 | Part 2 | |
|---|---|---|
Arduino pin 2 | → | Button pin 1 |
Button pin 2 | → | Arduino GND |
Buzzer pin 1 (+) | → | Arduino pin 8 |
Buzzer pin 2 (-) | → | Arduino GND |
Let's make your code choose!
Press the button and the buzzer beeps. Let go and it stops — your code decides!
An "if" choice like this runs alarms, games, and robots every day.
The problem
You want one thing to happen when the button is down, and another when it is up.
Think of it like
It's like saying "If it is raining, take an umbrella."
It decides when the buzzer should beep.
Arduino
The brain
Press it to tell the brain to make sound.
Button
The button
It beeps when the brain says so.
Buzzer
The noise maker
Check button
This question is only true while you are holding the button down.
if (digitalRead(BUTTON_PIN) == LOW)
Play tone
Inside the if, the buzzer plays a beep at pitch 440.
tone(BUZZER_PIN, 440);
Otherwise stop
When you are not pressing, noTone keeps the buzzer quiet.
else { noTone(BUZZER_PIN); }Then loop back to step 1
Follow these steps in order. Match the wires to the colors shown.
Place Arduino
Place the Arduino (uno) on the breadboard.
Arduino placed — ready to build!
Place Button
Place the Button (btn1) on the breadboard.
Place Buzzer
Place the Buzzer (bz1) on the breadboard.
Connect Arduino pin 2 to Button (btn1) 1.l
Connect Arduino pin 2 to Button (btn1) 1.l.
Connect Button (btn1) 2.l to Arduino GND
Connect Button (btn1) 2.l to Arduino GND.
Connect Buzzer (bz1) 1 to Arduino pin 8
Connect Buzzer (bz1) 1 to Arduino pin 8.
Connect Buzzer (bz1) 2 to Arduino GND
Connect Buzzer (bz1) 2 to Arduino GND.
Get input and output ready
void setup() {
  pinMode(BUTTON_PIN, INPUT_PULLUP);
  pinMode(BUZZER_PIN, OUTPUT);
}
The button is set to listen, and the buzzer pin is set to push sound out.
The if / else choice
void loop() {
  if (digitalRead(BUTTON_PIN) == LOW) {
    tone(BUZZER_PIN, 440);
  } else {
    noTone(BUZZER_PIN);
  }
  delay(20);
}
One path plays a beep, the other stops it — that is an if/else choice.
const int BUTTON_PIN = 2;
const int BUZZER_PIN = 8;
void setup() {
  pinMode(BUTTON_PIN, INPUT_PULLUP);
  pinMode(BUZZER_PIN, OUTPUT);
}
void loop() {
  if (digitalRead(BUTTON_PIN) == LOW) {
    tone(BUZZER_PIN, 440);
  } else {
    noTone(BUZZER_PIN);
  }
  delay(20);
}
Q1. Where does work that repeats go?
Q2. What happens when the button is NOT pressed?
Make the beep higher — change tone(BUZZER_PIN, 440) to use 880.
Hint: It's inside the if, line 9.
Add a note (comment) above the if line: // buzzer when pressed
Hint: That's line 8.
A line-by-line tour of the sketch — the same steps as in Robot Gurukul Studio.
Program overview
Big idea
Every Arduino program has a top part, a setup() part that runs once, and a loop() part that runs again and again.
In this project
Hold the button and the buzzer plays a beep. Let go and it stops.
Tip
Read from the top to the bottom. Tap any word or line if you need help!
const int BUTTON_PIN = 2;
const int BUZZER_PIN = 8;
setup()
Big idea
setup() runs one time when the board turns on.
In this project
It gets the button ready to listen and pin 8 ready for the buzzer.
Why here
Things we do only once go inside setup().
void setup() {
  pinMode(BUTTON_PIN, INPUT_PULLUP);
  pinMode(BUZZER_PIN, OUTPUT);
}
loop()
Big idea
loop() runs again and again, forever.
In this project
It keeps asking "is the button pressed?" and beeps or stays quiet.
Why here
Things that repeat go inside loop().
void loop() {
  if (digitalRead(BUTTON_PIN) == LOW) {
    tone(BUZZER_PIN, 440);
  } else {
    noTone(BUZZER_PIN);
  }
  delay(20);
}
Try this: Change a number inside loop(), then press Run to see what happens.
pinMode
Big idea
pinMode tells a pin if it will listen or push power out.
In this project
It makes pin 2 listen to the button and pin 8 push sound to the buzzer.
Why here
It goes in setup() because we only set it once.
pinMode(BUTTON_PIN, INPUT_PULLUP);
digitalRead
Big idea
digitalRead checks if a pin is ON or OFF.
In this project
It checks if you are pressing the button.
Why here
It goes in loop() so we can react the moment you press.
if (digitalRead(BUTTON_PIN) == LOW) {tone
Big idea
tone makes a buzzer play a beep at a chosen pitch.
In this project
When you press, it plays a 440 note.
Why here
It goes in loop() so it can play when the button is held.
tone(BUZZER_PIN, 440);
noTone
Big idea
noTone stops the buzzer so it goes quiet.
In this project
When you let go of the button, the beep stops.
Why here
It goes in loop() to turn the sound off when not pressing.
noTone(BUZZER_PIN);
delay
Big idea
delay means wait. Nothing else happens while it waits.
In this project
A tiny wait makes the button read nice and steady.
Why here
Right after we check the button and play or stop the sound.
delay(20);