It decides which bars to light for each number.
Arduino
The brain
Loading part…
display a counter value
Count 0-9 on a common-cathode 7-segment display controlled via 7 digital pins.
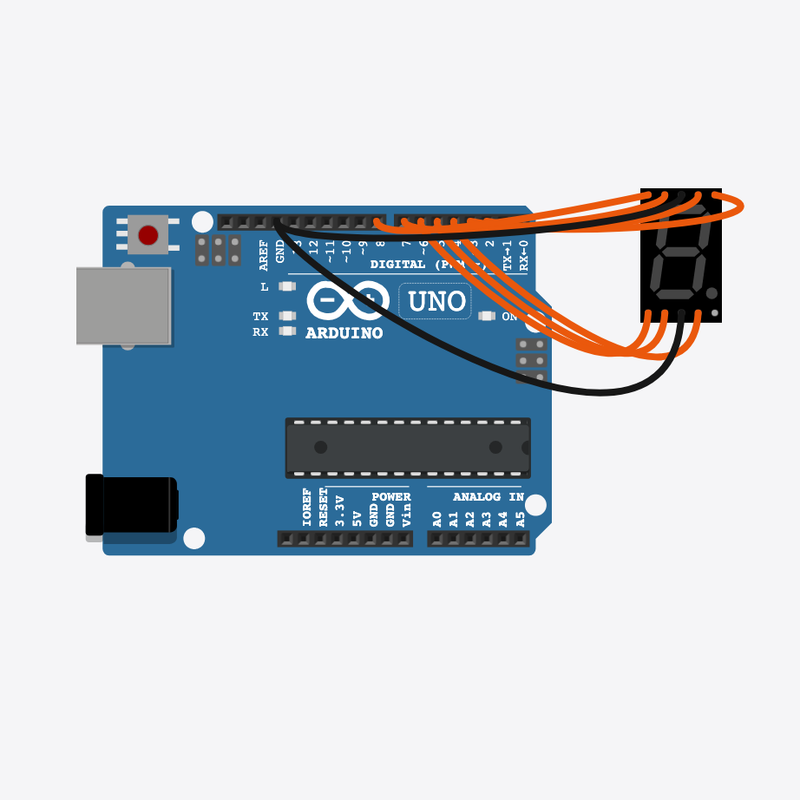
Pin connections
| Part 1 | Part 2 | |
|---|---|---|
Arduino pin 2 | → | 7-segment display seg A |
Arduino pin 3 | → | 7-segment display seg B |
Arduino pin 4 | → | 7-segment display seg C |
Arduino pin 5 | → | 7-segment display seg D |
Arduino pin 6 | → | 7-segment display seg E |
Arduino pin 7 | → | 7-segment display seg F |
Arduino pin 8 | → | 7-segment display seg G |
7-segment display COM | → | Arduino GND |
7-segment display COM | → | Arduino GND |
Draw numbers with light!
Seven tiny bars light up in different shapes to show every number from 0 to 9.
Microwave timers, elevator floor numbers, and digital clocks all use these number displays.
The problem
One light can only turn on or off. To show a number we need seven little bars working together.
Think of it like
It's like drawing numbers with seven sticks — each number has its own shape.
It decides which bars to light for each number.
Arduino
The brain
Seven little bars that light up to make any number 0 to 9.
7-segment display
The number screen
Get the bars ready
Pins 2 to 8 get ready — one wire for each of the seven bars.
pinMode(SEG_A + i, OUTPUT);
Count up the numbers
This loop tries 0, then 1, then 2… all the way up to 9.
for (int digit = 0; digit <= 9; digit++)
Light the right bars
This helper looks up the number's shape and lights the right bars.
showDigit(digit);
Hold, then next number
Each number stays on screen for a moment, then the next one shows.
delay(800);
Then loop back to step 2
Follow these steps in order. Match the wires to the colors shown.
Place Arduino
Place the Arduino (uno) on the breadboard.
Arduino placed — ready to build!
Place 7-segment display
Place the 7-segment display (seg1) on the breadboard.
Connect Arduino pin 2 to 7-segment display (seg1) anode (+)
Connect Arduino pin 2 to 7-segment display (seg1) anode (+).
Connect Arduino pin 3 to 7-segment display (seg1) B
Connect Arduino pin 3 to 7-segment display (seg1) B.
Connect Arduino pin 4 to 7-segment display (seg1) cathode (-)
Connect Arduino pin 4 to 7-segment display (seg1) cathode (-).
Connect Arduino pin 5 to 7-segment display (seg1) D
Connect Arduino pin 5 to 7-segment display (seg1) D.
Connect Arduino pin 6 to 7-segment display (seg1) E
Connect Arduino pin 6 to 7-segment display (seg1) E.
Connect Arduino pin 7 to 7-segment display (seg1) F
Connect Arduino pin 7 to 7-segment display (seg1) F.
Connect Arduino pin 8 to 7-segment display (seg1) G
Connect Arduino pin 8 to 7-segment display (seg1) G.
Connect 7-segment display (seg1) COM.2 to Arduino GND
Connect 7-segment display (seg1) COM.2 to Arduino GND.
Connect 7-segment display (seg1) COM.1 to Arduino GND
Connect 7-segment display (seg1) COM.1 to Arduino GND.
The number shapes
const uint8_t DIGITS[10] = {
  0b0111111,
  0b0000110,
  0b1011011,
  0b1001111,
  0b1100110,
  0b1101101,
  0b1111101,
  0b0000111,
  0b1111111,
  0b1101111,
};
DIGITS[] is a list of shapes — one pattern of bars for each number 0 to 9.
The showDigit() helper
void showDigit(int digit) {
  uint8_t pattern = DIGITS[digit];
  for (int seg = 0; seg < 7; seg++) {
    digitalWrite(SEG_A + seg, (pattern >> seg) & 1);
  }
}
This little helper looks at the shape and turns each of the seven bars on or off.
Count 0 to 9
void loop() {
  for (int digit = 0; digit <= 9; digit++) {
    showDigit(digit);
    Serial.println(digit);
    delay(800);
  }
}
loop() shows 0, then 1, then 2… up to 9, again and again.
const int SEG_A = 2;
const uint8_t DIGITS[10] = {
  0b0111111,
  0b0000110,
  0b1011011,
  0b1001111,
  0b1100110,
  0b1101101,
  0b1111101,
  0b0000111,
  0b1111111,
  0b1101111,
};
void showDigit(int digit) {
  uint8_t pattern = DIGITS[digit];
  for (int seg = 0; seg < 7; seg++) {
    digitalWrite(SEG_A + seg, (pattern >> seg) & 1);
  }
}
void setup() {
  for (int i = 0; i < 7; i++) {
    pinMode(SEG_A + i, OUTPUT);
    digitalWrite(SEG_A + i, LOW);
  }
  Serial.begin(9600);
  Serial.println("7-Segment Counter Demo");
}
void loop() {
  for (int digit = 0; digit <= 9; digit++) {
    showDigit(digit);
    Serial.println(digit);
    delay(800);
  }
}
Q1. Where does repeating work belong?
Q2. What does the for loop's digit do?
Show each number longer — change delay(800) to delay(1200) in loop().
Hint: Line 32 inside the for loop.
Add a note (comment) on the pattern line that says it comes from DIGITS[].
Hint: Line 15 inside showDigit().
A line-by-line tour of the sketch — the same steps as in Robot Gurukul Studio.
Program overview
Big idea
Every Arduino program has a top part, a setup() part that runs once, and a loop() part that runs again and again.
In this project
We light up the seven little bars on a number display to show the numbers 0 to 9.
Tip
Read from the top to the bottom. Tap any word or line if you need help!
const int SEG_A = 2;
const uint8_t DIGITS[10] = {
  0b0111111,
  0b0000110,
  0b1011011,
  0b1001111,
  0b1100110,
  0b1101101,
  0b1111101,
  0b0000111,
  0b1111111,
  0b1101111,
};
void showDigit(int digit) {
  uint8_t pattern = DIGITS[digit];
  for (int seg = 0; seg < 7; seg++) {
    digitalWrite(SEG_A + seg, (pattern >> seg) & 1);
  }
}
setup()
Big idea
setup() runs one time when the board turns on.
In this project
It gets pins 2 to 8 ready, one for each bar, and opens the message screen.
Why here
Things we do only once go inside setup().
void setup() {
  for (int i = 0; i < 7; i++) {
    pinMode(SEG_A + i, OUTPUT);
    digitalWrite(SEG_A + i, LOW);
  }
  Serial.begin(9600);
  Serial.println("7-Segment Counter Demo");
}
loop()
Big idea
loop() runs again and again, forever.
In this project
This is where the display counts 0, 1, 2… up to 9 and starts over.
Why here
Things that repeat go inside loop().
void loop() {
  for (int digit = 0; digit <= 9; digit++) {
    showDigit(digit);
    Serial.println(digit);
    delay(800);
  }
}
Try this: Change a number inside loop(), then press Run to see what happens.
pinMode
Big idea
pinMode tells a pin if it will listen or push power out.
In this project
It gets each bar's pin ready to push power out.
Why here
It goes in setup() because we only set the pins once.
pinMode(SEG_A + i, OUTPUT);
digitalWrite
Big idea
digitalWrite turns a pin ON or OFF.
In this project
ON lights one little bar, OFF leaves it dark — together they draw a number.
Why here
It goes inside the helper so each bar can change.
digitalWrite(SEG_A + seg, (pattern >> seg) & 1);
delay
Big idea
delay means wait. Nothing else happens while it waits.
In this project
It keeps each number on screen long enough to read.
Why here
Right after we show a number.
delay(800);
begin
Big idea
Serial.begin opens a message screen so the board can talk to the computer.
In this project
It lets us print each number too.
Why here
It goes in setup() once, before we print anything.
Serial.begin(9600);
println
Big idea
Serial.println writes on the screen and then jumps to a new line.
In this project
It prints a friendly hello when the board turns on.
Why here
So each message gets its own line.
Serial.println("7-Segment Counter Demo");