It thinks and decides when the light turns on.
Arduino
The brain
Loading part…
digitalRead() reads an input pin
Toggle an LED with a pushbutton using internal pull-up resistor on pin 2.
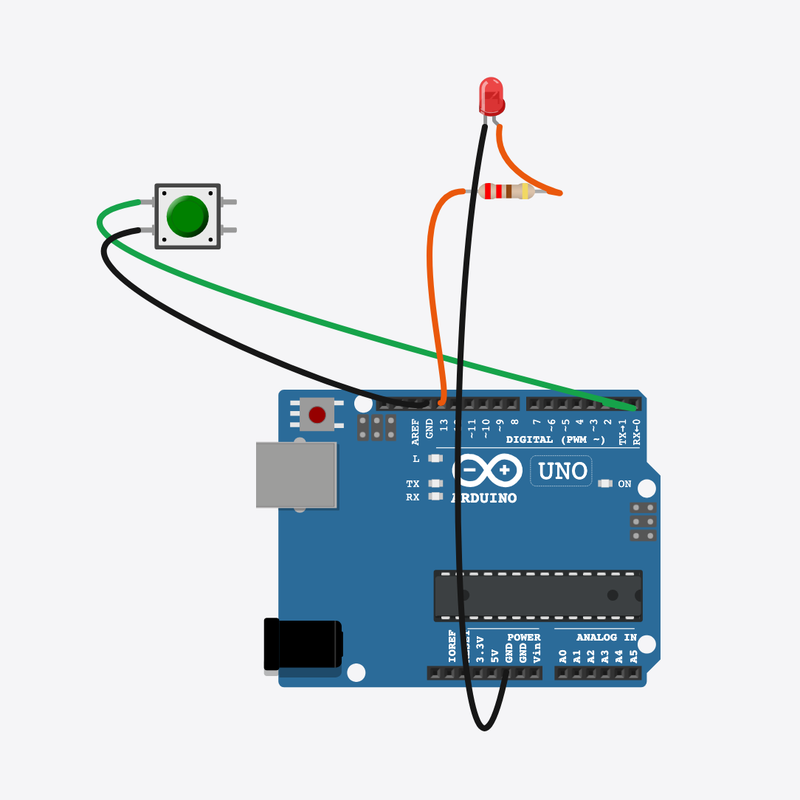
Pin connections
| Part 1 | Part 2 | |
|---|---|---|
Arduino pin 2 | → | Button pin 1 |
Button pin 2 | → | Arduino GND |
Arduino pin 13 | → | Resistor pin 1 |
Resistor pin 2 | → | LED anode (+) |
LED cathode (-) | → | Arduino GND |
Your code can listen to you!
Press the button and the light jumps on. Let go and it turns off!
Every keyboard key and game controller button works just like this.
The problem
A light that only blinks cannot react to you. We need a way to read a button.
Think of it like
It's like asking "Is someone at the door?" before turning on the porch light.
It thinks and decides when the light turns on.
Arduino
The brain
You press it to send a message to the brain.
Button
The button
Slows the power down so the light does not get hurt.
Resistor
The protector
It copies the button — on when you press, off when you let go.
LED
The light
Read the button
The board checks the button. With this wiring, a press counts as LOW, which means "pressed".
bool pressed = (digitalRead(BUTTON_PIN) == LOW);
Mirror to the LED
The light copies the button — on while you hold it, off when you let go.
digitalWrite(LED_PIN, pressed ? HIGH : LOW);
Small pause
A tiny wait keeps the reading steady, then loop() checks the button again.
delay(50);
Then loop back to step 1
Follow these steps in order. Match the wires to the colors shown.
Place Arduino
Place the Arduino (uno) on the breadboard.
Arduino placed — ready to build!
Place Button
Place the Button (btn1) on the breadboard.
Place Resistor
Place the Resistor (r1) on the breadboard.
Place LED
Place the LED (led1) on the breadboard.
Connect Arduino pin 2 to Button (btn1) 1.l
Connect Arduino pin 2 to Button (btn1) 1.l.
Connect Button (btn1) 2.l to Arduino GND
Connect Button (btn1) 2.l to Arduino GND.
Connect Arduino pin 13 to Resistor (r1) 1
Connect Arduino pin 13 to Resistor (r1) 1.
Connect Resistor (r1) 2 to LED (led1) anode (+)
Connect Resistor (r1) 2 to LED (led1) anode (+).
Connect LED (led1) cathode (-) to Arduino GND
Connect LED (led1) cathode (-) to Arduino GND.
Getting the button ready
void setup() {
  pinMode(BUTTON_PIN, INPUT_PULLUP);
  pinMode(LED_PIN, OUTPUT);
  Serial.begin(9600);
INPUT_PULLUP makes pin 2 read HIGH until you press the button, which pulls it LOW.
Reading the button
void loop() {
  bool pressed = (digitalRead(BUTTON_PIN) == LOW);
  digitalWrite(LED_PIN, pressed ? HIGH : LOW);
  Serial.println(pressed ? "Button pressed" : "Button released");
  delay(50);
Each time through loop(), the board reads the button and copies it to the light and the screen.
const int BUTTON_PIN = 2;
const int LED_PIN    = 13;
void setup() {
  pinMode(BUTTON_PIN, INPUT_PULLUP);
  pinMode(LED_PIN, OUTPUT);
  Serial.begin(9600);
}
void loop() {
  bool pressed = (digitalRead(BUTTON_PIN) == LOW);
  digitalWrite(LED_PIN, pressed ? HIGH : LOW);
  Serial.println(pressed ? "Button pressed" : "Button released");
  delay(50);
}
Q1. Where does work that repeats go?
Q2. When you press the button, what does the pin read?
Make the button check slower — change delay(50) to delay(100).
Hint: It's the last line inside loop(), line 12.
Add a little note (comment) on the line that reads the button, line 9.
Hint: Type // and your words at the end of line 9, like: // is the button pressed?
A line-by-line tour of the sketch — the same steps as in Robot Gurukul Studio.
Program overview
Big idea
Every Arduino program has a top part, a setup() part that runs once, and a loop() part that runs again and again.
In this project
When you press the button, the light turns on. Let go, and it turns off.
Tip
Read from the top to the bottom. Tap any word or line if you need help!
const int BUTTON_PIN = 2;
const int LED_PIN    = 13;
setup()
Big idea
setup() runs one time when the board turns on.
In this project
It gets the button ready to listen and pin 13 ready for the light.
Why here
Things we do only once go inside setup().
void setup() {
  pinMode(BUTTON_PIN, INPUT_PULLUP);
  pinMode(LED_PIN, OUTPUT);
  Serial.begin(9600);
}
loop()
Big idea
loop() runs again and again, forever.
In this project
It keeps checking the button and turns the light on or off.
Why here
Things that repeat go inside loop().
void loop() {
  bool pressed = (digitalRead(BUTTON_PIN) == LOW);
  digitalWrite(LED_PIN, pressed ? HIGH : LOW);
  Serial.println(pressed ? "Button pressed" : "Button released");
  delay(50);
}
Try this: Change a number inside loop(), then press Run to see what happens.
pinMode
Big idea
pinMode tells a pin if it will listen or push power out.
In this project
It makes pin 2 listen to the button and pin 13 push power to the light.
Why here
It goes in setup() because we only set it once.
pinMode(BUTTON_PIN, INPUT_PULLUP);
digitalWrite
Big idea
digitalWrite turns a pin ON or OFF.
In this project
ON lights up the LED, OFF turns it dark.
Why here
It goes in loop() so the light can keep changing.
digitalWrite(LED_PIN, pressed ? HIGH : LOW);
digitalRead
Big idea
digitalRead checks if a pin is ON or OFF.
In this project
It checks if you are pressing the button.
Why here
It goes in loop() so we can react the moment you press.
bool pressed = (digitalRead(BUTTON_PIN) == LOW);
delay
Big idea
delay means wait. Nothing else happens while it waits.
In this project
A tiny wait makes the button read nice and steady.
Why here
Right after we check the button and set the light.
delay(50);
begin
Big idea
Serial.begin opens a way for the board to send words to your computer screen.
In this project
It lets the program print "Button pressed" or "Button released".
Why here
It goes in setup() once, before we print anything.
Serial.begin(9600);
println
Big idea
println sends a line of words to the screen.
In this project
It prints whether the button is pressed or let go.
Why here
In loop() so each new message shows on its own line.
Serial.println(pressed ? "Button pressed" : "Button released");